Hi! This is a third-person game prototype with advanced locomotion and battle system. Enhanced, but similar systems are used in well-known AAA RPG games, so the idea was to replicate some functionality using the Unreal Engine.
The project is root-motion-based. ~97% of Main character animations are pure keyframe, the rest of them and the NPC animations are created with a Mixamo mocap.
In this article, besides the animation part, I'll try to describe some technical stuff, and If you are a beginner in Unreal Engine I might recommend you to check out the basics here:
https://www.behance.net/gallery/89722101/FPS-Tutorial-Unreal-Engine
https://www.behance.net/gallery/89722101/FPS-Tutorial-Unreal-Engine
The article probably is quite large, but it is logically structured, so in case you're bored with the locomotion section or something - feel free to skip that part and go straight to combat system and action. Also don't be shy to play the videos, the main juice is there.
Let's get started!
Summary
State Machine:
Orient Based Locomotion:
- Idle & Aim Offsets
- Walking, Jogging, Running, Sprinting, Turns
- Walking, Jogging, Running, Sprinting, Turns
- Starts & Turns in place
- Stops
Strafe Locomotion
Jumps
Equip/Unequip Weapon
Anim Dynamics
Combat System:
Melee Hit Combo
Directional Attacks
Long-Range Attack & Dodge
Hit Reactions
Quick Overview of NPC
Download the Build
Download the Build
State Machine
Orient Based Locomotion
The orient-based locomotion is a basis for a character's calm state, generally, it involves idles, movement cycles like walking, jogging, sprinting, and different transition animations like starts, stops, turns, etc. The main thing here - the character smoothly follows target direction, adjusting rotation in a process (you can achieve it by using Orient Rotation To Movement node).
Orient Based Locomotion State Machine:

1) The entry point to the state machine could be to Idles or Movement state, depending on is the speed = 0 or not. Let's say the character is not moving, so we are entering the Idles state.
2) If the player press and holds WSAD for a certain time (like ~0.1 seconds) - we should go to a Starts state, which in essence is a transition from idle to jogging.
3) After the start animation is finished - we're going to the Movement state and staying there while WASD is still pressed.
4) When the player releases the input for a certain time (again, like ~ 0.1 seconds ) - a stop condition is triggered, and we're going to the Stops state.
5) After a stop animation is finished we're going to to the Idles state, and the cycle repeats.
So, let's start with Idles and then go step by step through each state
Idles & Aim Offsets
Aim offset is needed to synchronize mouse input and character's look, as the result it looks like the character is looking in the same direction as the player:
Aim offset node is plugged in right after the Idle animation:

Idle animation is chosen by Blend Poses By Bool node, depending on is weapon equipped or not. And the same thing is true to every next state - choosing one of 2 pack of animations, with sword in hands or without it.
As this project contains only 2 locomotions, I can use a bool variable. In case some project contains more locomotions, for example, with an additional two-handed weapon, or range weapon, or heavy weapon - you might wanna use an enumerator, and choose animations by Blend Poses By Enum node, or create animation maps and choose a required clip by a key.
Yaw and Pitch variables calculation: https://blueprintue.com/blueprint/dwk5zgs-/
Walking, Jogging, Running, Sprinting, Turns
Movement cycles are located in a blendspace, where first axis is a speed, and the second one is a turn angle. This allows to smoothly interpolate between different movement types and lean the character according to the given direction. Blendspaces are located in a separate state machine, to be able to run 180 degree turns or transition animations like from jogging to "turbo-speed".


Yaw Delta calculation: https://blueprintue.com/blueprint/g46pbfop/
BaseAnimSpeed calculation: https://blueprintue.com/blueprint/ha251165/
In my case, AnimSpeed = BaseAnimSpeed * multiplier (0.5 for walk, 1 for jog, 2 for run and 3 for sprint)
180 Degrees turn condition: https://blueprintue.com/blueprint/_j-i8nrv/
Starts & Turns in Place
Starts & turns in place is a blendspace where axises are AnimSpeed and Initial Direction from -180 to 180 degrees. Blendspace is also placed in a separate state machine with two identical states, it's a little hack to make interruption of animation possible.


To calculate direction we need to get a relative rotation of a camera and subtract a vector of player's input:
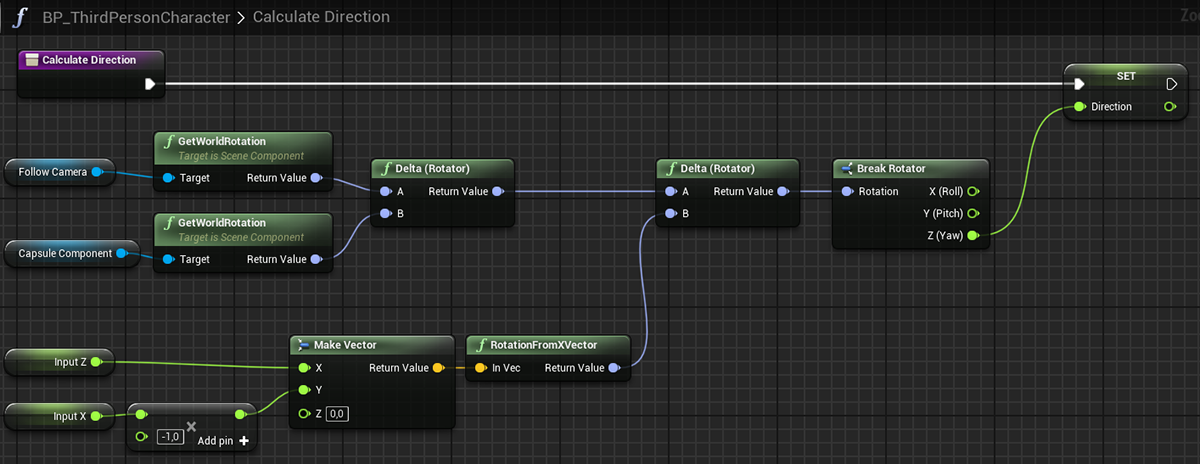
Initial direction is the direction recorded once at start, and rounded to get one of these values: -180, -135, -90, -45, 0, 45, 90, 135, 180. How to do that: https://blueprintue.com/blueprint/5chvzwq1/
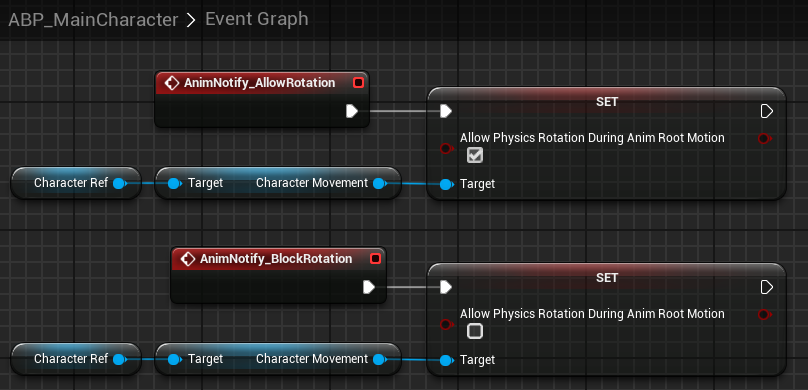
Events Allow/Block rotation are turning on/off the parameter "allow physics rotation during root motion", at the beginning of the start it should be turned off, and after the character has rotated in a given direction - turned on, to allow control by mouse input:
To get a seamless transition from start animation to a jogging cycle we need to expose as a pin the Start Position of a blendspace, and set it manually in a blueprint, depending on the phase of the cycle:

And the variable setup: https://blueprintue.com/blueprint/lo9ohmv0/
Stops
If the player releases WSAD for a certain time, a stop condition will be triggered: https://blueprintue.com/blueprint/sx4_oyed/
Then, to blend from movement cycle to Stop animation seamlessly we need to know a phase of a movement cycle, to define what animation to trigger - left foot stop or right foot stop. To do that we can use a little trick - put a curve inside a movement animation, animate it from 0 to 1, and get value from there using a Get Curve Value node:


And with this variable, we can calculate an exact start position to make the transition seamless: https://blueprintue.com/blueprint/8itwrd8i/
And how it looks in an animation state:

Some little issues could happen on the borderline between phases of the cycle when one Stop animation is too short and the other is too long. So in that case more Stop animations could help, for example, large games usually use not 2, but at least 4 Stop animations for different phases of movement.
Strafe Locomotion
Thanks to strafes the character is able to move in a given direction, maintaining focus on the target enemy:
The switch to strafes works by Blend Poses By Bool node:


Movement input is a direction vector decomposed into two axes:
https://blueprintue.com/blueprint/gooo_2la/
https://blueprintue.com/blueprint/gooo_2la/
Jumps
Jumps are located in a separate state machine, which uses the whole locomotion (orient and strafes) as a base state:


Blend conditions are isInAir? bool extracted from a character movement component and inJump? bool which is set after Jump input, pretty standard stuff: https://blueprintue.com/blueprint/-dxyifih/
Equip/Unequip Weapon
Animation montage is played inside slot which affects right hand only, without affecting the body, it allows playing equip/unequip animations any time:

When hand and spine weapon sockets match - events are triggered, these events launch AttachComponentToComponent node, which parents weapon to the required socket: https://blueprintue.com/blueprint/qng9h1lj/
Anim Dynamics
Anim dynamics allows to simulate the physical like movement inside the Unreal Engine. It is incredibly helpful and allows to avoid a ton of keyframe work animating cloth, hair, tails, etc.
To use it you need to add joints chains to the rig for a part of a model you'd like to animate, then inside the engine, you need to set up box "collisions" and constraints to control joints behavior, and limits (spherical or planar) to avoid things like hair going inside the body. etc.
Hair joint chains, box "collisions" for a single chain, anim dynamics node settings, spherical limits:


How it looks roughly https://blueprintue.com/blueprint/6l3zotpe/
Combat System
The battle system involves targeting, soft lock on the target enemy, mele-hit combo attacks, long-range attacks, dodge, dealing damage, and hit reactions. Also, I made a simple enemy prototype using Mixamo animations, to test things out. In this article, we'll focus on the animation part of the systems and the dev part will be covered very briefly.
Targeting System: https://blueprintue.com/blueprint/nbvd2thp/
Melee Hit Combo
Attack condition https://blueprintue.com/blueprint/-ngqok13/
Essentially, after the attack input and if all conditions have matched, we should play either compo part or combo end animation montage, and for that, we can use a combo counter variable:

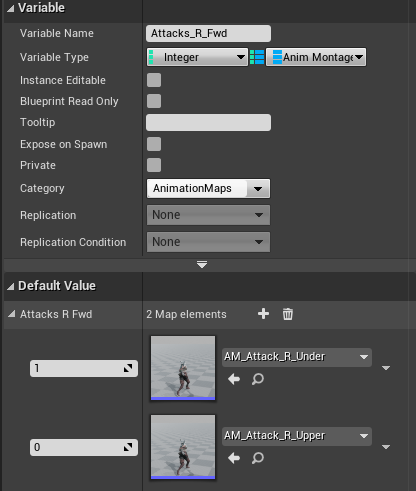
And the animation montage could be chosen randomly from the animation map:

A full setup could be found here: https://blueprintue.com/blueprint/jkmp5xdy/
Directional Attacks
The target actor could be located not only straightforward relatively to our character, but in any direction, it could be left or right or even behind, and for these cases, directional attacks are used:
Attack direction can be calculated using Find Look at Rotation node:

Based on Direction to Target value we should play one of the directional attack animations, -180, -135, -90, -45, 0, 45, 90, 135, 180 degrees. And Attack Direction Delta is a difference between turn value inside attack animation and the actual direction to target:


So, let's say the enemy is standing at 120 degrees relatively to our character, 120/45 = 2.66 ≈ 3, so the attack index would be 3, and we should play 45*3 = 135 degrees attack animation. The attack direction delta would be 135 - 120 = 15 degrees, this is a value we should rotate our character programmatically, to make attack animation match the enemy:

Of course, there would be a tiny foot sliding, but it's okay.
Rotate character:
Rotation variables: https://blueprintue.com/blueprint/i6em86m3/
Rotation function: https://blueprintue.com/blueprint/8be6g4tz/
Rotation function: https://blueprintue.com/blueprint/8be6g4tz/
Long-Range Attacks & Dodge
Usually, a long-range attack's logic is similar to the short-range, you need to find direction to target, distance, then play appropriate animation and adjust programmatically distance/direction. But I didn't want to create another set of 16 attack animations, so for this prototype I came up with a simplification - play additive shift animation with a regular attack, as the result - the player is able to overcome long distances during the attack animation.
The opacity of the shift animation defines the distance:

Long-range attacks logic: https://blueprintue.com/blueprint/zrqherbf/
and animations https://blueprintue.com/blueprint/vbtxi-r9/
and animations https://blueprintue.com/blueprint/vbtxi-r9/
And the same trick I used for the dodge ability - just a shift in a given direction, using additive animation and some FX. Of course, AAA games use more complicated setups with jumping or rolling out in different directions, but it could be a topic for another article.
Dodge ability logic: https://blueprintue.com/blueprint/e8bm9j73/
Hit Reactions
Regarding hit reactions. Each attack animation contains a special event which triggers an Attack Trace function (just a line/spherical trace with a few modifications). Then, if the Attack Trace function reports a hit event, we need to play animation depending on the direction of that hit, which could be calculated using Find Loot at Rotation node.
After that we can choose animation index with this macros: https://blueprintue.com/blueprint/hmu4g94o/
And knowing the index just play an animation montage from a map:

Attack Trace function: https://blueprintue.com/blueprint/oc0cvt8x/
Receiving Damage event: https://blueprintue.com/blueprint/l9iconq3/
Receiving Damage event: https://blueprintue.com/blueprint/l9iconq3/
Quick Overview of NPC
I've taken animations from Mixamo, and with a few modifications used them in the NPC's Animation Blueprint.
So, the basis of locomotion is a Strafes Blendspace, and a Jumping State Machine. After that, an Aim offset is applied, it allows NPC to keep focus at Player when needed. The next things are Upper and Full Body slots (for skills and hit reactions), Foot IK, Physical Animation Snapshot. Also, I posted blueprints below if you are interested.
So, the basis of locomotion is a Strafes Blendspace, and a Jumping State Machine. After that, an Aim offset is applied, it allows NPC to keep focus at Player when needed. The next things are Upper and Full Body slots (for skills and hit reactions), Foot IK, Physical Animation Snapshot. Also, I posted blueprints below if you are interested.
BP Base Enemy https://blueprintue.com/blueprint/7mkavbh4/
ABP Mutant https://blueprintue.com/blueprint/siq2v3c2/
ABP Mutant https://blueprintue.com/blueprint/siq2v3c2/
Download The Build
You can play this demo by downloading the archive here:
https://drive.google.com/file/d/1XFWyGilDwi_H66QgFaX9DysGrBGT-wSw/view
https://drive.google.com/file/d/1XFWyGilDwi_H66QgFaX9DysGrBGT-wSw/view
Controls:
WASD - Move
Space - Jump
Ctrl - Walk
Shift - Run
Mouse middle button - Superspeed
Left mouse button - Attack
Shift + Left mouse button - Long Range Attack
Alt - Dodge
WASD - Move
Space - Jump
Ctrl - Walk
Shift - Run
Mouse middle button - Superspeed
Left mouse button - Attack
Shift + Left mouse button - Long Range Attack
Alt - Dodge
1 - Equip sword
2 - Unequip sword and go to Calm state (orient-based locomotion)
3 - Agro state (strafe locomotion) & equip sword
4 - Calm state (orient-based locomotion)
5 - Cheat menu
6 - Show controls
7 - Infinite health
8 - Infinite stamina
9 - Show debug
2 - Unequip sword and go to Calm state (orient-based locomotion)
3 - Agro state (strafe locomotion) & equip sword
4 - Calm state (orient-based locomotion)
5 - Cheat menu
6 - Show controls
7 - Infinite health
8 - Infinite stamina
9 - Show debug
Resume
This is it! If you are still here - thank you very much for watching! :D
If you have any questions - I'd be happy to answer them in the comments section.
Thank you!


